Friday, March 07, 2008
How to make subtitles in a Final Cut Pro (FCP) movie
Making subtitles in a Final Cut Pro movie is a breeze. Subtitles are just text slides; if you put a text slide on a track above your movie track then that slide would run as a subtitle slide in your movie.
Making subtitles in a Final Cut Pro movie is a breeze. Subtitles are just text slides; if you put a text slide on a track above your movie track then that slide would run as a subtitle slide in your movie.
Labels: subtitling, video, ویڈیو، مووی، فائنل کٹ پرو، سب ٹائٹل کیسے لگائیں
Sunday, June 17, 2007
Wireless Network Security--Keep network open, hide its name
A very useful way to protect your otherwise open wireless network is to stop broadcasting the network's name (SSID). When you interact with your wireless router through a computer you have the option of not checking the "Broadcast SSID" box. Your network remains open, but others cannot see it. When friends visit you and they want to connect to your wireless network, all you have to do is to tell them the name of the network. They can go into the option of "connect to non-broadcasting network" in their computer, type in the name of your network, and get connected.
A very useful way to protect your otherwise open wireless network is to stop broadcasting the network's name (SSID). When you interact with your wireless router through a computer you have the option of not checking the "Broadcast SSID" box. Your network remains open, but others cannot see it. When friends visit you and they want to connect to your wireless network, all you have to do is to tell them the name of the network. They can go into the option of "connect to non-broadcasting network" in their computer, type in the name of your network, and get connected.
Labels: hidden SSID, Open wireless network
Tuesday, April 03, 2007
A macro called PPTXML1_3_2, in Microsoft's Unlimited Potential program
Microsoft provided the following information about this macro:
PPTXML1_3_2 macro.
This macro is used to localized ppt files. You will find a Slides folder under every Instructor Files folder. There are also a few ppt files under the Practice folder of the Presentation Fundamentals course. This macro will help you localize this files faster.
Double-click the PPTXML1_3_2.ppt. Go to Tools\Macro - Run Macro. The Export feature is used to extract the strings of the PPTs. The result is a xml file containing the strings and a ppt with the same name as the xml. The ppt contains “tags” to locate the position of the extracted strings. You will need this “new” PPTs to reconvert the localized xml files into PPTs. That is why they are both included in the handoff structure.
----
Ignoring the grammatical errors in the above narrative,
I opened the ppt file but was unable to run the macro as the 'Run' button was grayed out (it was not active).
On double-clicking the macro I was taken to Visual Basic Environment where on running the macro, got the following message:
"The macros in this project are disabled...."
I searched this error online and figured out how to use "Tools" menu to lower the security level in order to run the macro. The "Run" button now became active.
Sunday, November 19, 2006
Step by Step procedure to set up a secure home wireless network system
Till yesterday my wireless network was not secure. I heard it did not take much to secure the network--all I needed to do was to have a hard connection with the wireless network and then turn on the security. So I decided to give it a try. My wireless is now secure but only my desktop PC is now connected to it; a laptop sees the network but does not connect to it and the Mac keeps telling me ‘There was an error joining the selected Airport network.’ Nothing comes easy to me! My initial reaction was to change back the router settings to ‘factory’ i.e., an open system, the way it initially was, and the way all three computers liked it. But then I decided to be patient. I am reading stuff off the Internet and trying out various options. Hopefully the other two computers would be able to securely connect to the wireless network soon.
In any case, here is what I did to secure the home wireless network system.
1. I connected a computer to the wireless router (AirLink Super G), opened a browser window, and wrote 192.168.1.1 in the space where you type URL of a web page you want to visit. The wireless router options appeared on the screen. Under the ‘wireless security’ I changed ‘Security mode’ to WPA2-PSK and ‘Encryption’ to AES. It asked me for a Passphrase. I made up one. Now this Passphrase had to be used by any computer trying to hook up to my wireless network. The router saved the settings by restarting.
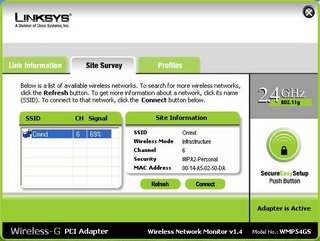
2. Then I went to my desktop. I did a right click on my wireless card icon (in the strip that includes the time clock, 'Start' button, etc.). I chose ‘Open the Monitor’ option (monitoring the wireless card). Here is what I saw.

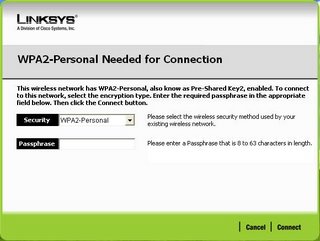
3. The window of available networks showed my wireless network. I highlighted it by clicking on it and then clicked on the ‘Connect’ button. It took me here.

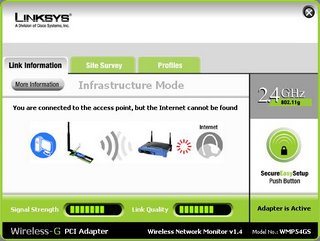
4. I entered the Passphrase I had selected at the router. The Passphrase was accepted and I got connected to my wireless network.

Till yesterday my wireless network was not secure. I heard it did not take much to secure the network--all I needed to do was to have a hard connection with the wireless network and then turn on the security. So I decided to give it a try. My wireless is now secure but only my desktop PC is now connected to it; a laptop sees the network but does not connect to it and the Mac keeps telling me ‘There was an error joining the selected Airport network.’ Nothing comes easy to me! My initial reaction was to change back the router settings to ‘factory’ i.e., an open system, the way it initially was, and the way all three computers liked it. But then I decided to be patient. I am reading stuff off the Internet and trying out various options. Hopefully the other two computers would be able to securely connect to the wireless network soon.
In any case, here is what I did to secure the home wireless network system.
1. I connected a computer to the wireless router (AirLink Super G), opened a browser window, and wrote 192.168.1.1 in the space where you type URL of a web page you want to visit. The wireless router options appeared on the screen. Under the ‘wireless security’ I changed ‘Security mode’ to WPA2-PSK and ‘Encryption’ to AES. It asked me for a Passphrase. I made up one. Now this Passphrase had to be used by any computer trying to hook up to my wireless network. The router saved the settings by restarting.
2. Then I went to my desktop. I did a right click on my wireless card icon (in the strip that includes the time clock, 'Start' button, etc.). I chose ‘Open the Monitor’ option (monitoring the wireless card). Here is what I saw.

3. The window of available networks showed my wireless network. I highlighted it by clicking on it and then clicked on the ‘Connect’ button. It took me here.

4. I entered the Passphrase I had selected at the router. The Passphrase was accepted and I got connected to my wireless network.

Sunday, November 05, 2006
Windows XP does not like AirLink AWLH4030
Ever since I have installed Windows XP on my desktop, the computer is frequently freezing up--the problem seems to be the compatibility between the operating system and the wireless network card's driver. In the evening, went to Fry's to check out available wireless cards. I want to buy one that would have the Windows XP logo on the box so that my system does not warn me of perils attached with installing an unrecognized device and threateningly ask me if I want to "Continue anyway?" Linksys is selling such cards (with XP logo on the box), but now I am worried about the compatibility between the Airlink router (that I already have) and the new Linksys card. I ended up not buying anything. Need to do more research, consult more knowledgeable people.
Ever since I have installed Windows XP on my desktop, the computer is frequently freezing up--the problem seems to be the compatibility between the operating system and the wireless network card's driver. In the evening, went to Fry's to check out available wireless cards. I want to buy one that would have the Windows XP logo on the box so that my system does not warn me of perils attached with installing an unrecognized device and threateningly ask me if I want to "Continue anyway?" Linksys is selling such cards (with XP logo on the box), but now I am worried about the compatibility between the Airlink router (that I already have) and the new Linksys card. I ended up not buying anything. Need to do more research, consult more knowledgeable people.
